|
Current Universal Time
is… Current Moon Phase |

www.my-spot.com .> Astronomy by Frank > Astrophotography
My experience with astrophotography has been rewarding and frustrating at the same time. While I no longer consider myself to be a beginner in this area of photography, it is still certainly the most difficult form of photography and one which requires a bit of research. I hope that this will help a few of you in your astrophotography attempts. However, it should be known that the face of Astrophotography is changing in very much the same way general photography is... Digital... Please bare in mind that this artical began its life back before the Digital Revolution in photography.
DIGITAL vs. FILM
The Digital Revolution in Photography has changed the natural path of getting started Astrophotography. The advantages of Digital or CCD, can be huge. The problem is that the first step of getting into Digital Astrophotography can be much much larger in terms of cost and effort. The average "point and shoot" digital camera is not well suited for astrophotography. The lowest level of suitable digital camera for astrophotography would be a dSLR (digital Single Lens Reflex - The kind with interchangable lenses - however there ARE some who have achieved very good results with what are often called digicams). The issue is then cost. An entry level dSLR tend (as of this writing) to cost around $500(USD) and a dedicated CCD astrocamera can cost many thousands of $$$. Of course this guide is not intended to be an all encompassing guide and there are very rapid changes occuring in equipement and technology. In fact this guide has changed greatly over the years it has existed. Costs for capable scopes and cameras have dropped and more folks are finding such equipement within reach.
FIRST STEP
For your first steps into astrophotography, the equipment you use need not be expensive or special. Basically you need a camera and a tripod. The following list should help.
- Camera: An older mechanical film SLR is usually the best. However, any camera with a bulb setting can be used. If you find (or better yet if you have) a camera such as the ones mentioned below, you may never need to get a different astro-camera. Features to look for include the bulb setting (a must), a mirror lockup (important), interchangeable focusing screens (nice for focusing those dark subjects). Of course a cable release is a must as well. Camera’s that fit this category include the Olympus OM-1, Minolta SRT-102 (or 101), and the NIKON F2. The Olympus OM-1 is considered the best all-around 35mm astro-camera. It is lightweight, smooth, fully mechanical (does not need batteries), has a mirror lock-up, and allows for the use of interchangeable focusing screens. The only problem with the OM-1 may be a lack of (or at least hard to find) "standard" lenses. The NIKON is also reported to be a good astro-camera and has a HUGE selection of quality standard lenses. The best camera is NOT a fancy electronic SLR. I have a Minolta Maxxum 9, possibly one of the best and most advanced SLRs available, but it is not my astro-camera. Why? Batteries! Astrophotography often requires that the shutter be open for long periods of time, for most new camera’s that means dead batteries before the evening is over. My primary astrophotography camera is a Minolta SRT-102. I chose the SRT-102 because I could use my existing Minolta MD lenses and the OM-1 was harder to find. My only regret has been that I cannot get a brighter focusing screen for it.
- Tripod: Almost any adjustable tripod should be ok. Make sure that you can pan up, the higher you can aim your camera the better. Remember that you may be able to aim your camera higher if you turn it 180° on the tripod head. Also make sure that you do not have to lie on the ground to look though the viewfinder. Adjustable legs are also nice for dealing with uneven ground. Of course, the sturdier the tripod the better.
- Len(s): So, now you need that $7000 APO or SCT with PEC and RA and DEC and DSC, Right? Wrong! The temptation is to get a long telephoto lens, but don’t! A big long lens probably will not be big and long enough for photos of much including the moon. There is a time for that big long lens but that comes later. The 50mm lens that you likely got with your SLR is the best place to start. Also, a wide angle lens in the 24 to 35mm range is a good thing to have. Fixed focal length lenses are usually better then zoom lenses do to the fact that zooms will often slide from one focal length to another when aimed upward. Also, fixed lenses tend to be sharper and brighter then zooms at a given focal length.
FILM
There are just a few good films suitable for astrophotography and with the rapid rise in Digital Cameras it seems there are fewer and fewer every month. An earlier developement was the trend toward more natural rendition of skin tones in color print film - this trend has "blinded" many films to the all important (for astrophotography) 656nm wavelength of light. This pretty much leaves slide film as the best astro film you can still get. Slide film is good because it tends to be of a what you see is what you get nature, color negative film had to be printed, and most labs are really bad at getting a good astrophoto off of a color negative. Also, NEVER let a lab cut the film strips, with astrophotos they cannot see the frames and often slice right through a frame…
- Ektachrome E200: A favorite slide film. Very red sensitive. Great for red nebula such as NGC7000 (The North America nebula). With the changes and discontinuations the Kodak has made to thier color print films, this may be one of our last hopes.
- Ektachrome E100VS: Slower, less grainy and higher contrast pro version of the E200. I have used this film with good results. But it does have one flaw, It really picks up light pollution!
- Fuji Provia 400F: I have used this film good results.
- Kodak LE400: Great color print film if you can find it, Kodak has long discontinued it. I have used it for many astrophotos with good results.
- Kodak Supra 400: Very fine grain for a 400 speed color print film. Overall this maybe (for now) one of the best overall astro films. This film may end up to be your favorite 400 speed daylight film as well. WARNING: As of September 2002 Kodak has killed this film for astrophotography with the latest changes to it and finding the older stuff is getting very hard.
Are their others? Yes, but I haven’t used them so I’m not going there… For more information, please see the links at the bottom of the page.
MORE STEPS & TELESCOPES
For starters, take a look at the buyers tips for telescopes. I’m not going to get into all the many and varied telescopes that you could buy for astrophotography because I simply do not have the time to write a book. However there are a few things to keep in mind. A telescope serves basically two purposes in astrophotography, it becomes a giant lens and/or a means to track objects as they move across the sky. I say "or" because, depending on what you plan to photograph, you may only require one of these aspects. So, what do you plan to photograph?
What you are here for… The Photos!
 |
 |
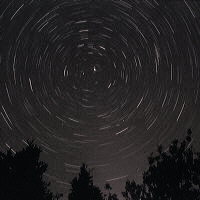 |
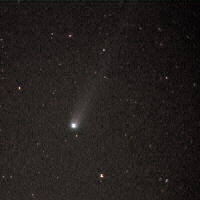
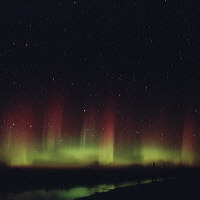
| Comets | Aurora | Star Trails |
- Your First Astrophotos: Bright comets, star fields & constellations, planetary conjunctions, auroras, and star trails to name a few. See the above examples. All were taken with ordinary camera lenses, a tripod, and a locking cable release…
- Big and Bright: The moon and sun fit this category. Tracking is not required but a long focal length is a plus. For satisfying photos a focal length greater then 600mm is good and anything over 2500mm will not allow you to fit the whole disk of the sun or moon on a 35mm frame. The sun REQUIRES a special solar filter or you will damage (if not destroy) your telescope, camera, or worst yet your eyes! Most solar filters fit over the aperture of the telescope and are about as dark as welding goggles. The moon does not require any special filters to photograph. I find that shutter speeds will range from 1/15 sec to 1/500 depending on many factors such as film speed, filter type, telescope f/ratio, etc.
- Tiny and Bright: The planets and close-ups of the moon fit here. Most planets are bright but the problem is they are very tiny! With a focal length of 2500mm Saturn looks like a dot on a 35mm frame. Planetary pictures often require a focal length of 5000mm or greater (I think 10000mm)! To do this, one needs a mount that can track the planet, and a device that will allow eyepiece projection. A Variable-Projection Tele-Extender is ideal for this. A Variable-Projection Tele-Extender, into which an eyepiece typically of about 9mm to 25mm focal length is inserted, attaches to the eyepiece-holder of your telescope. A T-Mount for your camera then connects your camera body to the Tele-Extender. This effectively increases the focal length of your telescope to a range that is good for Tiny and Bright subjects. Shutter speeds will often be in the ¼ sec to 15 sec range depending on a whole lot of factors.
- Big and Dim: The expanse of the Milkway and large structures go here. A couple of things can be used for this kind of astrophotography. A tripod mounted camera with really fast film and exposures of less then a minute can work. Also very satisfying photos can be made using a standard camera and normal to wide angle lens "piggybacked" onto a telescope with an equatorial mount and a method to track the sky (this can be done by hand but is much easier if the mount has a motor). When piggybacking, an exposure can be a few seconds to an hour or more.
- Small and Dim: Deep-space objects like galaxies and nebulas fit here. This can be the hardest form of astrophotography and requires the highest level of experience and equipment. These objects are very faint and small, so long exposures and guiding are necessary. I suggest that one first start with piggybacking to gain experience. You will need a telescope with a equatorial mount (the sturdier the better) with an accurate clock drive and a drive corrector (a hand controller) for making small corrections to the tracking. A camera such as mentioned above with an adapter and T-ring for connecting the camera to the telescope are obviously required. Also required is a guide scope or off-axis guider and an illuminated reticle (an eyepiece with an illuminated cross-hair or box), which allows you to track a guide star during the exposure. You will have to make guiding corrections using the hand controller because most amateur telescope mounts are not accurate enough to track by themselves. Many other factors also come into play, such as imperfect polar alignment earth’s axis and the RA axis of your telescopes mount, flexure of the mount during a long exposure, refraction of the Earth’s atmosphere, and others. After trying this method for a while you may wish to get a CCD autoguider, but that goes beyond this page at this time.